Python Development on Windows
Historically, Windows has been awful for developers (unless you’re working with .NET I guess), whereas Unix environments are generally easier to configure and developer tools pretty much just work. So, why am I bothering with Windows? Well, during the day I’m not - my work laptop is a Dell Precision running Ubuntu. However, my personal laptop is a Windows machine, which I chose because I also like gaming. If you’re a gamer Windows really is the only choice. I use my personal laptop for side projects and have been refining my setup for a few years now. I was initially drawn to Windows Subsystem for Linux (WSL) as I could continue using a Linux development environment. However, after repeated problems - the latest being git clone randomly stopped working, apparently due to an internet connectivity bug - I gave up and moved to using straight Windows. Below is how I’ve created a stable setup for Python development.
The Basics
Windows has several package managers: Chocolately, Scoop, and PowerShell Gallery. I use Scoop, for no particular reason. After installing Scoop we will need some basic tools. Unless otherwise stated all commands are run in PowerShell. I run PowerShell though Windows Terminal.
scoop install git
scoop bucket add extras
scoop install coreutils make
You can use Posh Git and Oh My Posh to make PowerShell look semi-decent. Install via Scoop:
scoop install posh-git oh-my-posh
Next, add the following to your PowerShell profile (found at $PROFILE):
Import-Module posh-git
Import-Module oh-my-posh
Set-Theme Robbyrussell
I like the minimalist Robby Russell theme, but there are loads to choose from.
Python
I would normally use Pyenv to manage Python versions. However, this doesn’t work on Windows. There is Pyenv-win for Windows but found it didn’t work especially well. I recently discovered Scoop has the ability to manage multiple versions of packages by adding the versions bucket
scoop bucket add versions
This, combined with Poetry for managing virtual environments and packaging, and the PyCharm IDE has made for an almost seamless Python workflow.
Multiple Python Versions
With the versions Scoop bucket you can install multiple Python versions. For example, to install Python 3.8 and 3.9 run the following in Powershell:
scoop install python38 python39
This will give you the latest patch releases for the two versions:
➜  ~ scoop list
Installed apps:

  python38 3.8.10 [versions]
  python39 3.9.5 [versions]
You are supposed to be able to switch between these versions with Scoop, but I found that didn’t work on my system. To select the correct version for you project you need an extra Poetry command over the standard poetry install as Poetry can’t find the Python executable in this case. Go into your project and create your virtual environment with poetry env use <python-version> . For example, for Python 3.9 run poetry env use python39. You can now poetry install as normal.
Updating Python Patch Versions
Updating Python from (for example) 3.8.1 to 3.8.2 can cause a major headache. You cannot install multiple patch releases for the same minor version using the Scoop, the latest patches always installed. This means if you update your python version, all Poetry environments based on that version will break and you will need to reinstall them (by which I mean forcibly remove then install). When you install Poetry it uses your default Python version, so updating this will break Poetry, which you will need to reinstall! It’s probably easier to just not update to newer patch versions. I’ve always completely ignored the patch version and have never had an issue. However, if you really want to update the patch version, the safest thing to do is remove Poetry and all your environments, do the update then reinstall. What a palaver!
Vim
Before discovering the wonders of PyCharm I was old school and used Vim. I still use it for making quick changes and editing random text files. Neovim is a usable, modern Vim-based editor, which works great on Windows. Again, install with Scoop:
scoop install neovim
Open PowerShell as an admin and create a configuration file:
md ~/AppData/Local/nvim
nvim ~/AppData/Local/nvim/init.vim
Add something to it (e.g. set nu to add line numbers). Install vim-plug with
md -p ~/AppData/Local/nvim-data/site/autoload
$uri = 'https://raw.githubusercontent.com/junegunn/vim-plug/master/plug.vim'
(New-Object Net.WebClient).DownloadFile(
  $uri,
  $ExecutionContext.SessionState.Path.GetUnresolvedProviderPathFromPSPath(
    "~\AppData\Local\nvim-data\site\autoload\plug.vim"
  )
)
In your init.vim add the following to the top to add plugins (here I’ve added the beautiful Darcula colour theme):
call plug#begin()
Plug 'dracula/vim'
call plug#end()
Run :PluginInstall from inside Neovim to install.
Finally, you can create an alias so you can call vim rather than nvim. To do this, edit your PowerShell profile with nvim $PROFILE and add the following line
New-Alias vim -Value nvim
This will be loaded automatically when you open PowerShell.
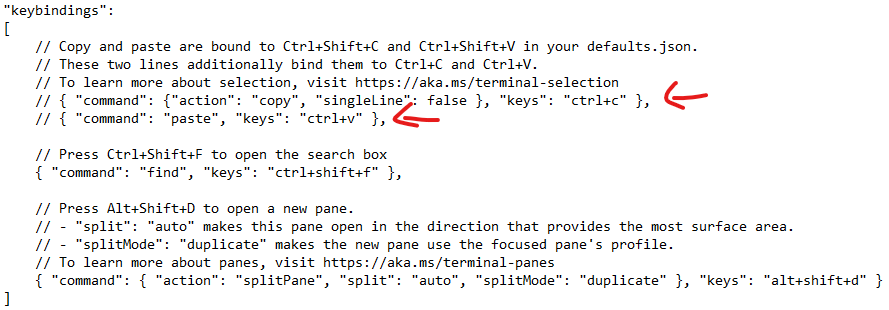
Gotcha: Copy-paste in Windows Terminal
If you’re using Windows Terminal, ctrl+s and ctrl+v have helpfully been mapped to copy and paste in addition to ctrl+shift+c and ctrl+shift+v. This is fine, except ctrl+v interferes with Vim! You can remove these key bindings by removing them in the keybindings section of the Windows Terminal settings (press ctrl + , to access), as shown below.
That’s all folks! I hope you found this useful. I will keep the post up-to-date as I discover more Windows-specific nuances.